Once in a while, we (OK, just Dr. Wong) goes overboard and wants to document the heck out of a case. So, in pure voyeuristic interest, the following photos depict a step-by-step viewing of a root canal procedure done in our Barrie office! We are sure you’d like the pics, because people like nothing more than looking at surgeries. Without further ado, but with many dentist-specific terms for the truly curious, here is a root canal completed on an upper left first molar (tooth 26, or tooth 14 for the Americans) as seen through the eyes of a dentist. This root canal was done due to obvious dental decay that had reached the nerve of the tooth. In cases like these, there are only two appropriate treatments: extraction of the tooth, or a root canal. Since this was a very saveable tooth, the patient agreed with our suggestion to perform a root canal.
A quick summary of this root canal:
Tooth:26
Canals:4
Pre-op diagnosis: vital, pulpal caries
Condition of tooth on access: hyperemic
Final canal instrumentation: MB1: 19mm to 35/0.04 MB2: 19mm to 35/0.04 DB: 19mm to 35/0.04 P: 22mm to #40 SS file
Warmed vertical condensation with GP via SystemB downpack and Obtura backfill.
Global 4-step surgical operating microscope. Here come the Barrie root canal photos!
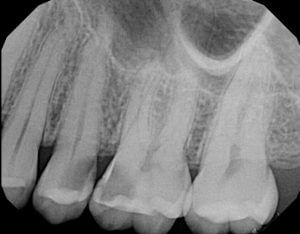
Pre-operative x-ray of tooth 26 (the one in the middle). The dark area at the left of the tooth is the decay. A similar dark area exists on the tooth adjacent to the decay, and will also require a root canal at a subsequent appointment. Dexis digital radiograph sensor.
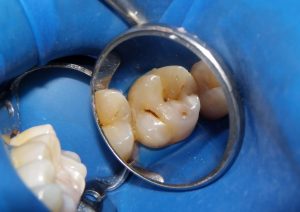
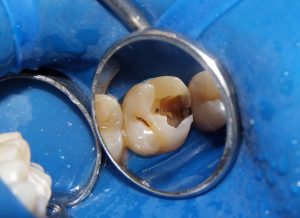
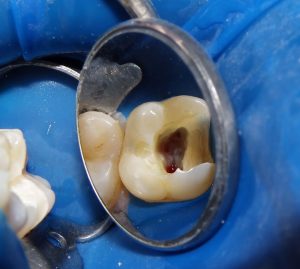
This is the preoperative appearance of the tooth. Note that since the decay started in between teeth, the tooth looks largely intact from the outside!Once the tooth is entered, the decay becomes obvious – it is massive, and will clearly reach the pulp. Once decay reaches this depth, a filling alone will not solve the problem – the dental pulp will still become infected.
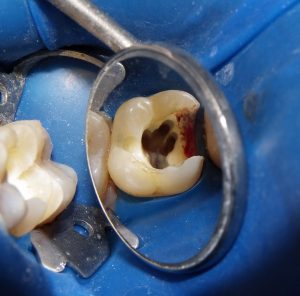
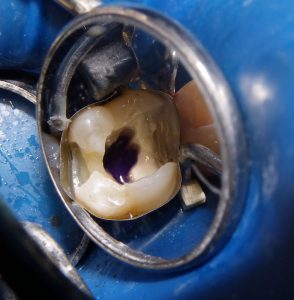
The bulk of the decay has been removed, and now we see a pinpoint of bleeding – this is the location of the pulp (or “nerve”) of the tooth. A root canal aims to remove all the bacteria and dead/dying/about-to-die tissue from the pulp space and all the way down the canals.
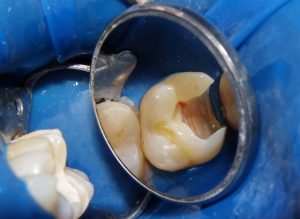
Further entry into the pulp chamber of the tooth reveals the start of the canals. In this photo you can see some definite points of bleeding. These will lead down the canals.
Another angle view of the canals, with bleeding evident.
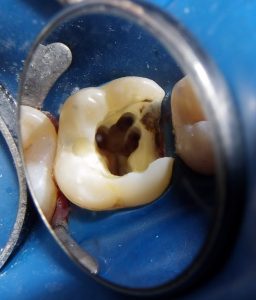
Further decay removal. The bleeding that appears is actually from the gums.
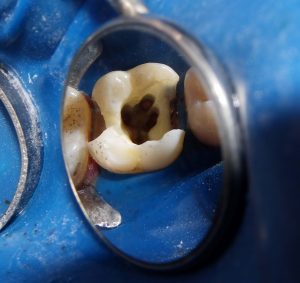
This photo shows the dental decay removed, the bleeding stopped, and the root canals enlarged with K3 nickel-titanium files (SybronEndo) to enable the flushing of disinfectant solution down the canals. We used 5.25% sodium hypochlorite to irrigate throughout the root canal instrumentation process, and also at the end of instrumentation using a piezoelectric ultrasonic tip (Irrisafe, Acteon). In addition, we used a 17% EDTA solution also agitated by the ultrasonic tip in order to remove inorganic debris.
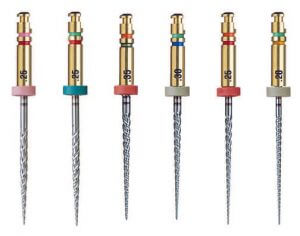
The actual file sequence was this, for those who really really want to know: Stainless steel files #8 and #10 (Lexicon C-files, Tulsa Dental) to patency, K3 files (Sybron Endo) 15-0.02, then 20-0.02 to length, 20-0.06 to flare coronally, 20-0.04 to length, then 25-0.04, 30-0.04, 35-0.04 to length. The palatal canal was futher instrumented to the apex with a #40 stainless steel file. Canal working lengths were determined with a Root ZX Electronic apex locator (J. Morita). All files were lubricated with RC Prep (Premier Dental).
K3 endodontic files. The two coloured rings at the top identify the file tip size and taper.
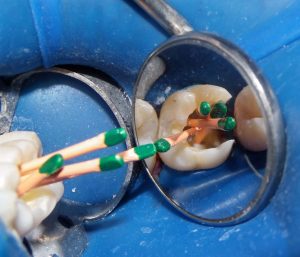
Gutta Percha rubber cones inserted into the canals to fill them. We use ZOE cement to cover the cones, and then use a SystemB (SybronEndo) heated tip to soften the rubber. Vertical comnpaction of the cones to within 4mm of the apex, followed by warmed gutta percha backfill (Obtura) back up to the top of the canals, condensing periodically with Nickel-Titanium condensers.
After searing off the tops of the gutta percha cones and vertical condensation, the four canals are considered cleaned and filled. The typical distribution of canals can be seen here. In this case, the MB1 and MB2 canals did merge. Additionally, decay at the other side of the tooth was removed prior to the filling.
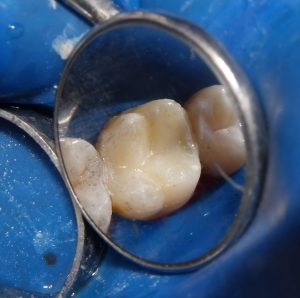
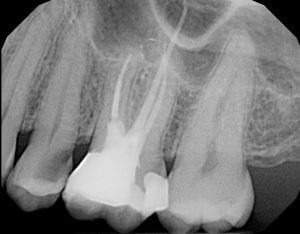
The root canal component is basically complete, and then is followed by the filling. A traditional Tofflemire matrix system with G-Rings was used to contain the filling material. We used air abrasion (PrepStart, Danville engineering (27um, 40psi) to create a clean surface, then acid etched with phosphoric acid. Bonding was done via OptiBond FL (Kerr) primer and adhesive. The purple seen here is intended to seal off the canals to prevent reinfection, and at the same time make it easier to locate the canals on any subsequent re-entry (PermaFlo Purple, Ultradent).The completed dental restoration. We used Dentsply‘s EsthetX direct composite resin. This tooth should now be protected with a full-coverage indirect restoration (onlay or crown) that provides cuspal coverage, or else the tooth will remain vulnerable to fracture.The post-operative root canal x-ray. The gutta percha filling is easily visible, as is the filling material. This tooth is still fragile, and should be protected with a restoration that provides cuspal coverage to prevent fracture. This can be a crown or an onlay. Our choice here would be an all-ceramic crown (e.max from Ivoclar at the moment).
We hope this provides you with a better understanding of the steps involved in a root canal, or at least the way we do things at the moment in our Barrie dental office. Our routine changes frequently (to the frustration of the dental assistants), but the goal remains the same: disinfection of the root canal system followed by sealing to prevent reinfection, all with minimal compromise to the strength of the tooth.
For a root-canal-related issue, or maybe just a complete examination to assess your overall oral status, please contact us! We’d love to be your Barrie dentist.